Stonham Parva / Little Stonham
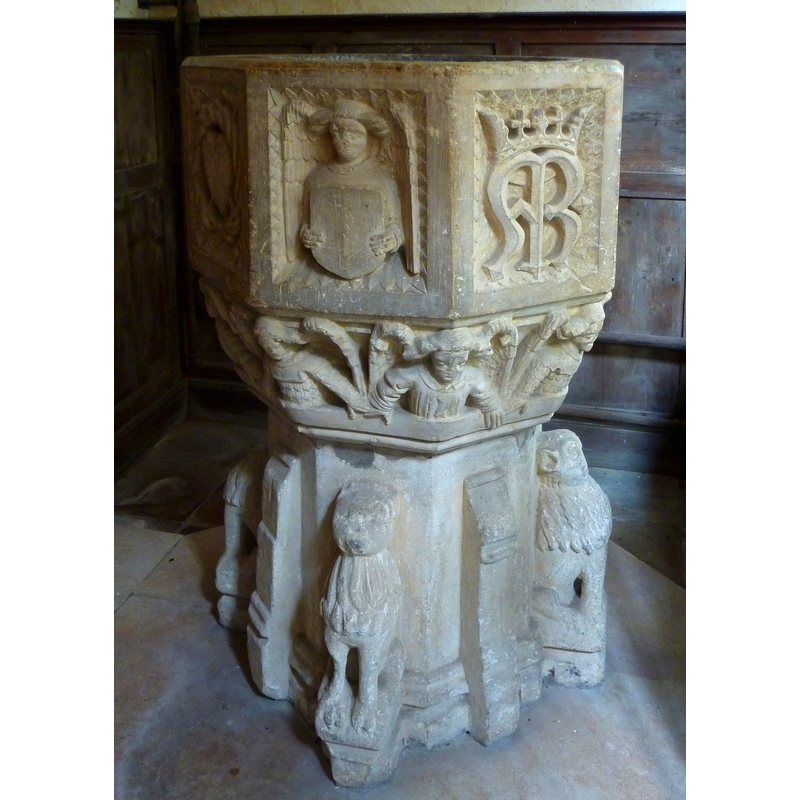
Image copyright © Janice Tostevin, 2012
Standing permission
Results: 27 records
B01: New Testament - Passion of Christ - Crucifixion - Mary - John the Evangelist
![or, St. Mary and St. Mary Magdalene? [cf. FontNotes] -- on the west side of the basin](/static-50478a99ec6f36a15d6234548c59f63da52304e5/compressed/1120618021_compressed.png)
Scene Description: or, St. Mary and St. Mary Magdalene? [cf. FontNotes] -- on the west side of the basin
Copyright Statement: Image copyright © Janice Tostevin, 2012
Image Source: digital photograph taken 4 July 2011 by Janice Tostevin for BSI
Copyright Instructions: Standing permission
B02: symbol - Christ - the instruments of the Passion - crown of thorns, pierced heart, etc.
![crosed by a small spear and a lance [cf. FontNotes]; on the southwest side of the basin](/static-50478a99ec6f36a15d6234548c59f63da52304e5/compressed/1120618022_compressed.png)
Scene Description: crosed by a small spear and a lance [cf. FontNotes]; on the southwest side of the basin
Copyright Statement: Image copyright © Janice Tostevin, 2012
Image Source: digital photograph taken 4 July 2011 by Janice Tostevin for BSI
Copyright Instructions: Standing permission
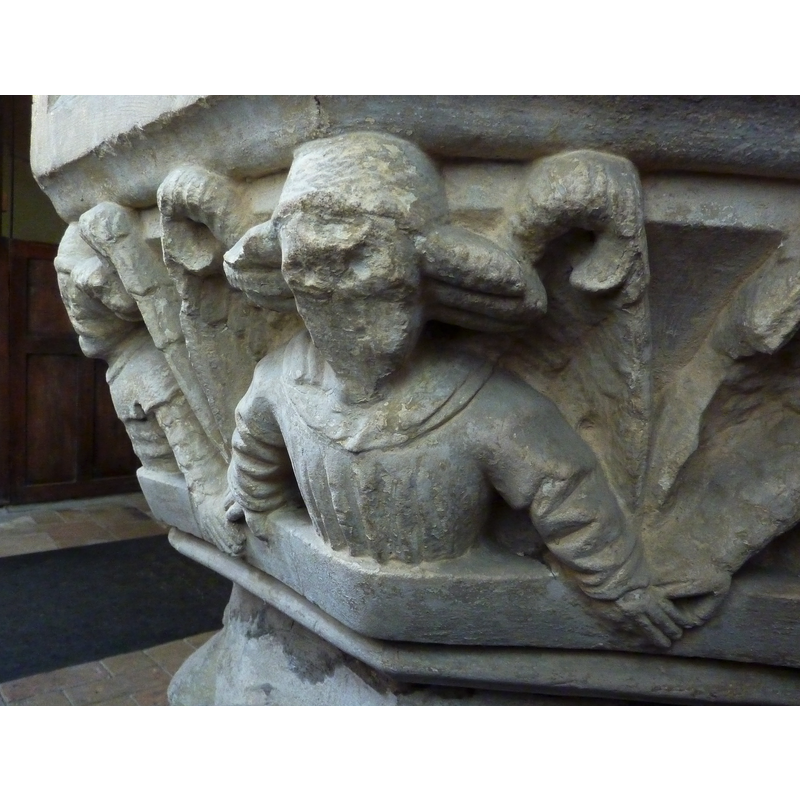
B03: angel - demi-figure - holding shield - blank
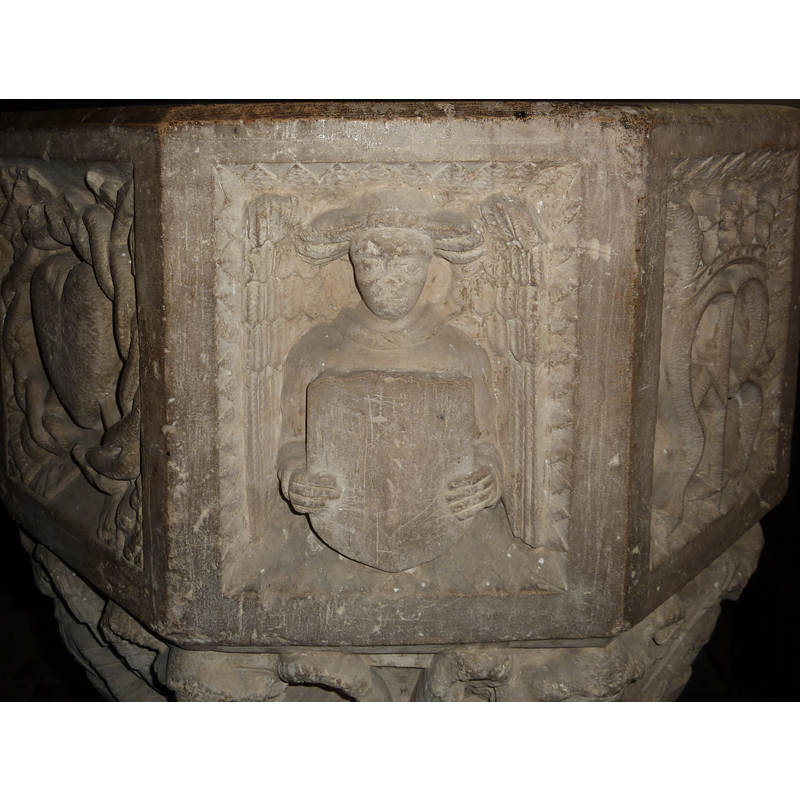
Scene Description: on the south side of the basin
Copyright Statement: Image copyright © Janice Tostevin, 2012
Image Source: digital photograph taken 4 July 2011 by Janice Tostevin for BSI
Copyright Instructions: Standing permission
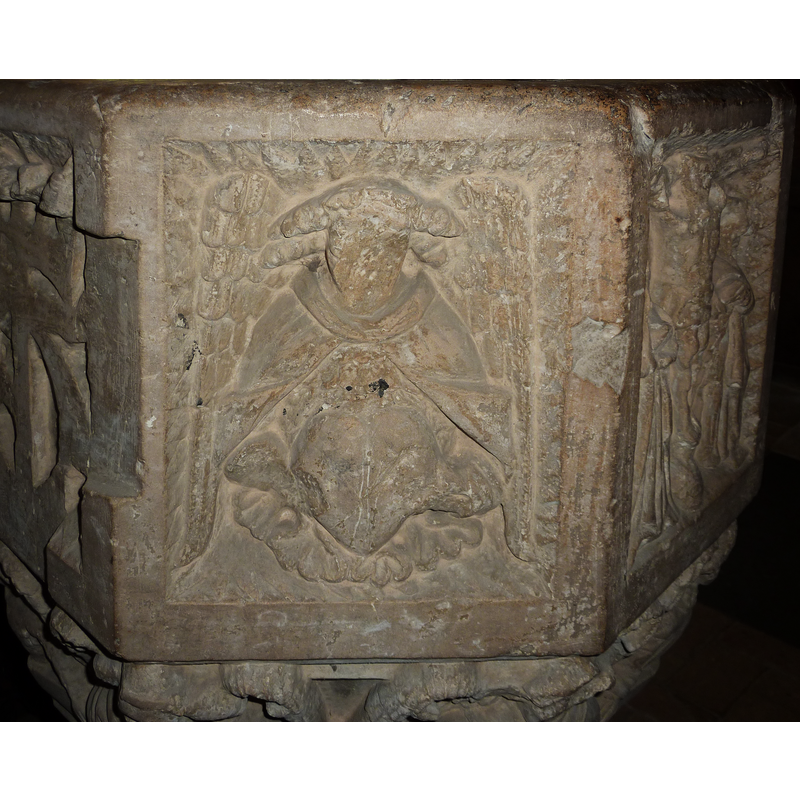
B04: Virgin Mary - Marian symbol (crowned)
![a later re-carving? [cf. FontNotes] -- on the southeast side of the basin](/static-50478a99ec6f36a15d6234548c59f63da52304e5/compressed/1120618024_compressed.png)
Scene Description: a later re-carving? [cf. FontNotes] -- on the southeast side of the basin
Copyright Statement: Image copyright © Janice Tostevin, 2012
Image Source: digital photograph taken 4 July 2011 by Janice Tostevin for BSI
Copyright Instructions: Standing permission
B05: angel - demi-figure - holding shield - emblem - unidentified
Scene Description: on the east side of the basin; unlike the previous shield, this one had an emblem on it, but it has been crudely hacked off and is no longer identifiable
Copyright Statement: Image copyright © Janice Tostevin, 2012
Image Source: digital photograph taken 4 July 2011 by Janice Tostevin for BSI
Copyright Instructions: Standing permission
B06: design element - motifs - floral - rose - Tudor rose - in a cusped or radiated panel
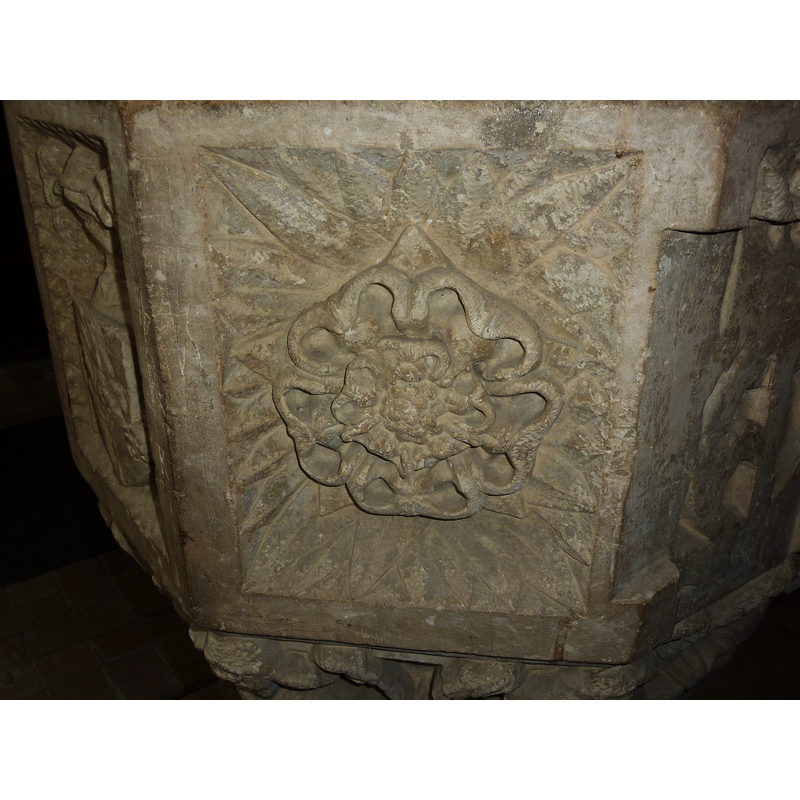
Scene Description: on the northeast side of the basin
Copyright Statement: Image copyright © Janice Tostevin, 2012
Image Source: digital photograph taken 4 July 2011 by Janice Tostevin for BSI
Copyright Instructions: Standing permission
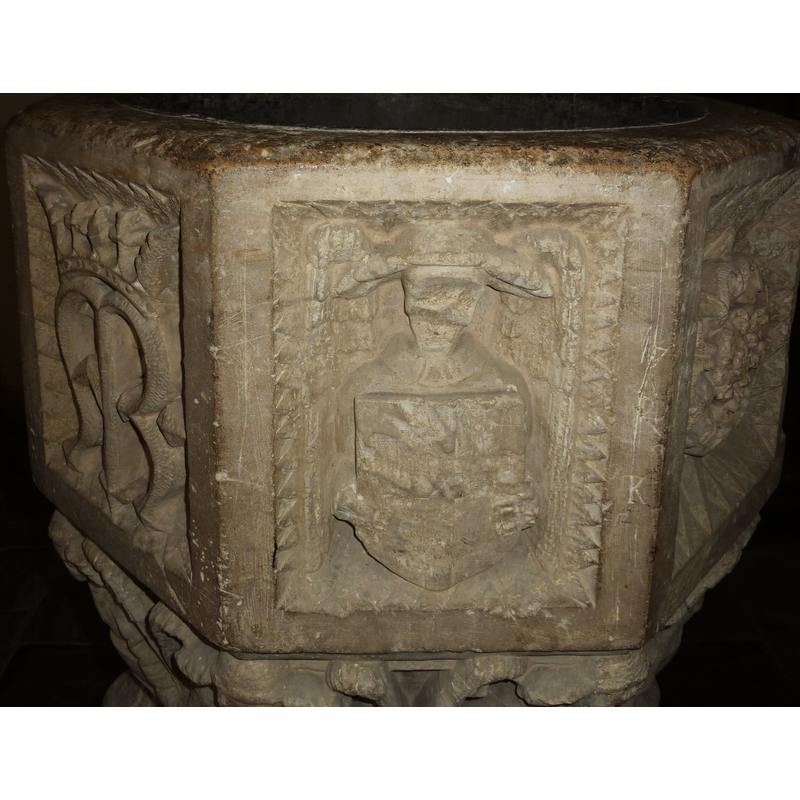
B07: symbol - shield - coat of arms - crowned
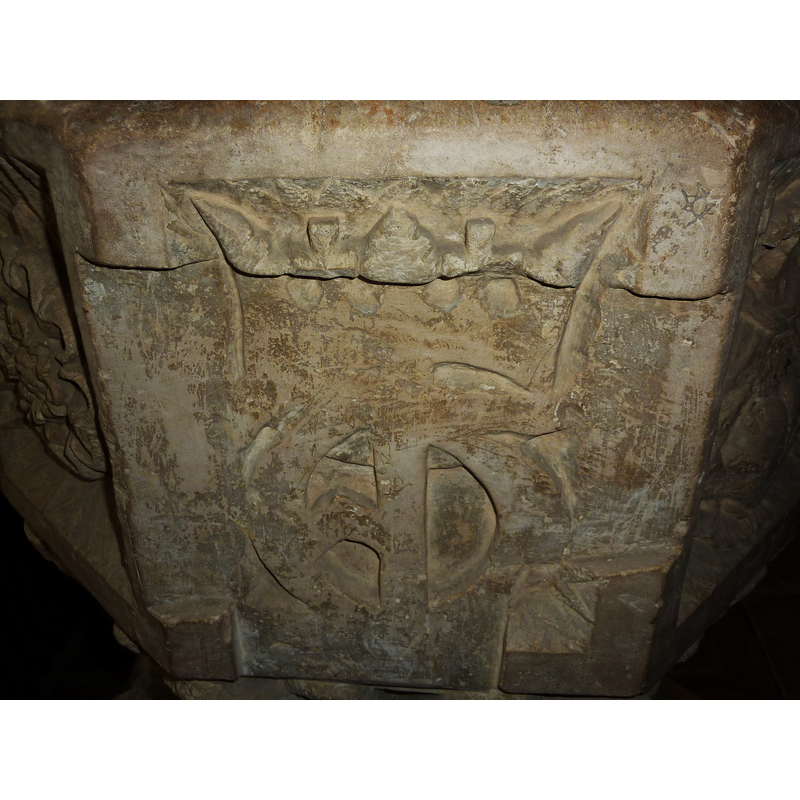
Scene Description: on the north side of the basin; this panel has been almost entirely cut off, except the top of the crown above, and a new emblem shallowly re-carved on the new surface; the remaining top of the crown has two crosses on it and appears to have served as the model for the Marian crown on the other side
Copyright Statement: Image copyright © Janice Tostevin, 2012
Image Source: digital photograph taken 4 July 2011 by Janice Tostevin for BSI
Copyright Instructions: Standing permission
B08: angel - demi-figure - holding heart
Scene Description: to the left of the Crucifixion, on the northwest side of the basin
Copyright Statement: Image copyright © Janice Tostevin, 2012
Image Source: digital photograph taken 4 July 2011 by Janice Tostevin for BSI
Copyright Instructions: Standing permission
B09: design element - patterns - sawtooth
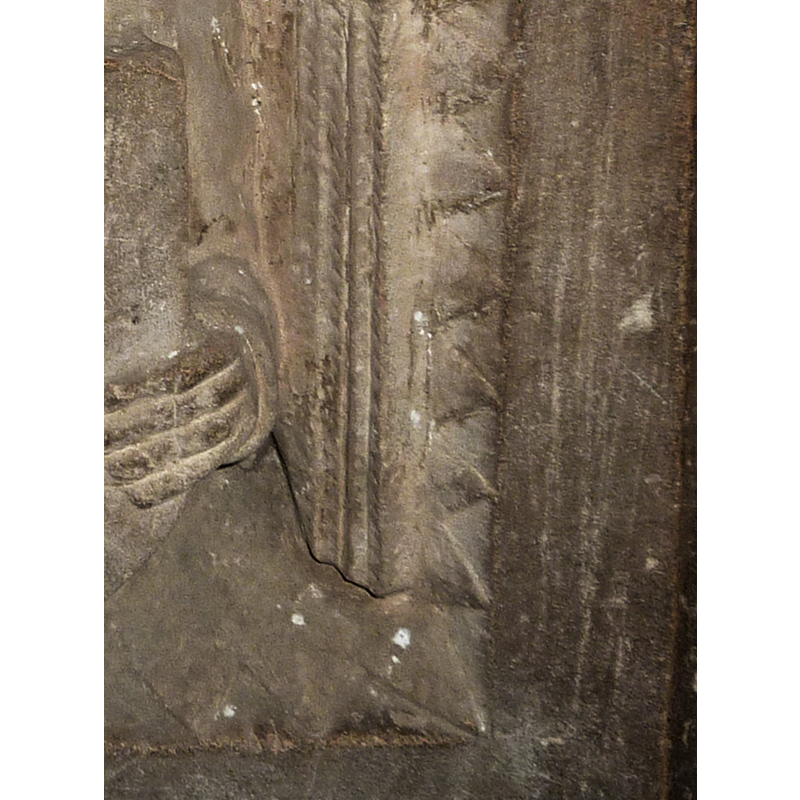
Scene Description: several of the scenes or motifs on the basin panels are framed in a saw-tooth pattern
Copyright Statement: Image copyright © Janice Tostevin, 2012
Image Source: digital photograph taken 4 July 2011 by Janice Tostevin for BSI
Copyright Instructions: Standing permission
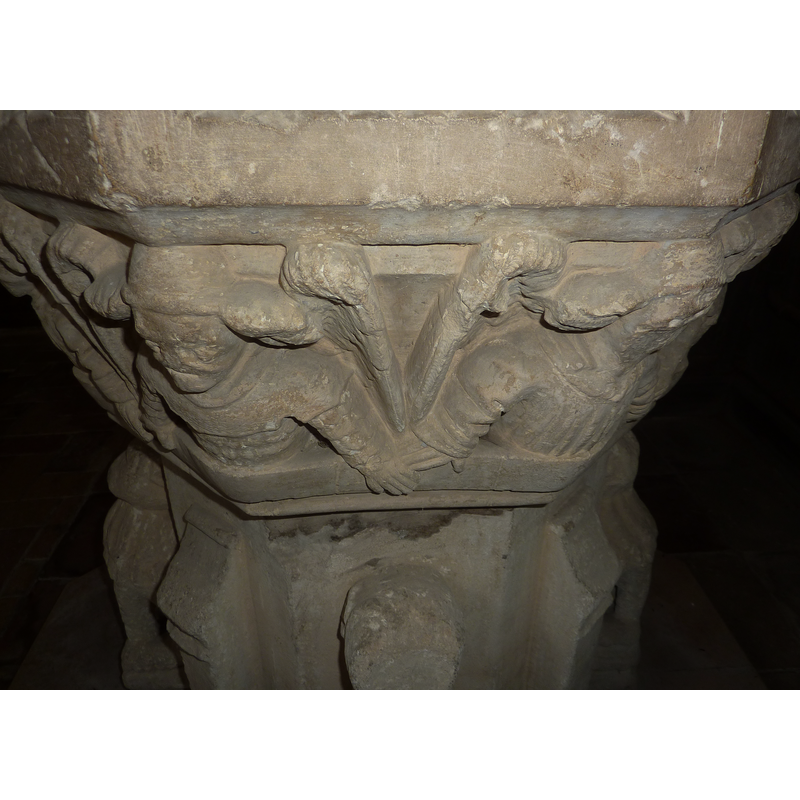
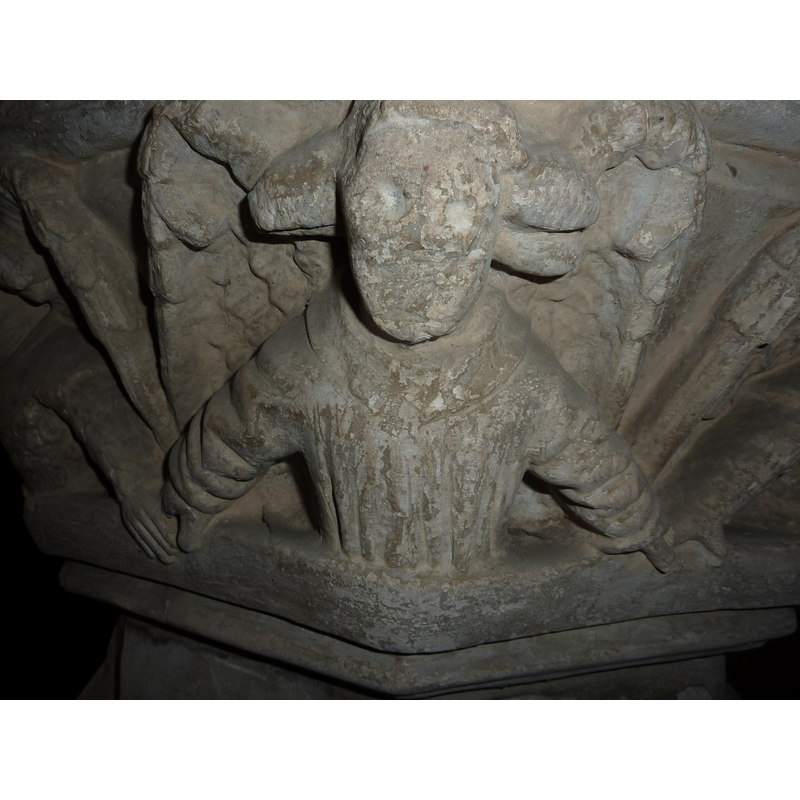
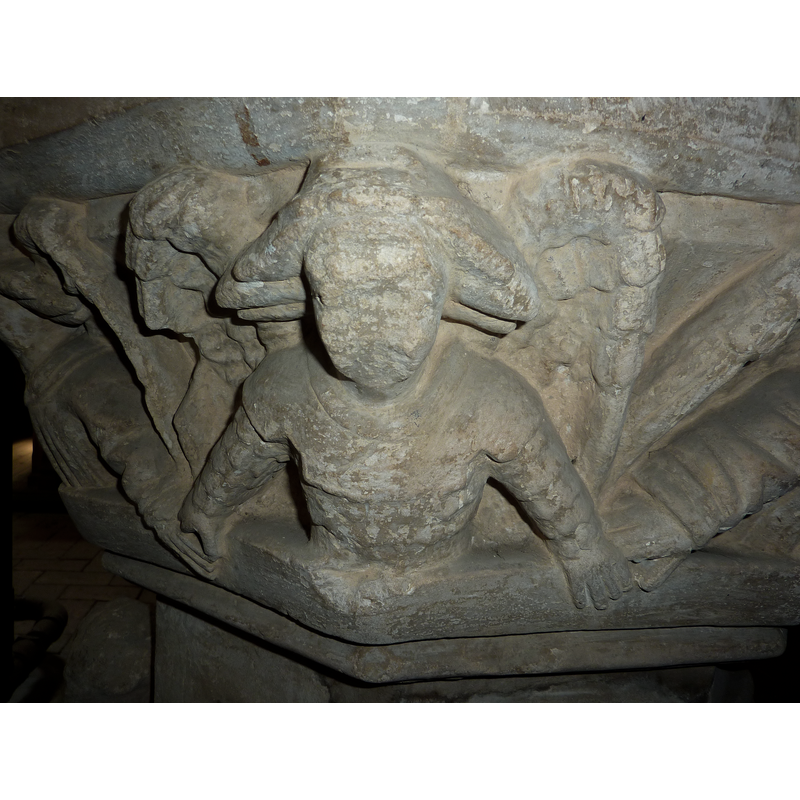
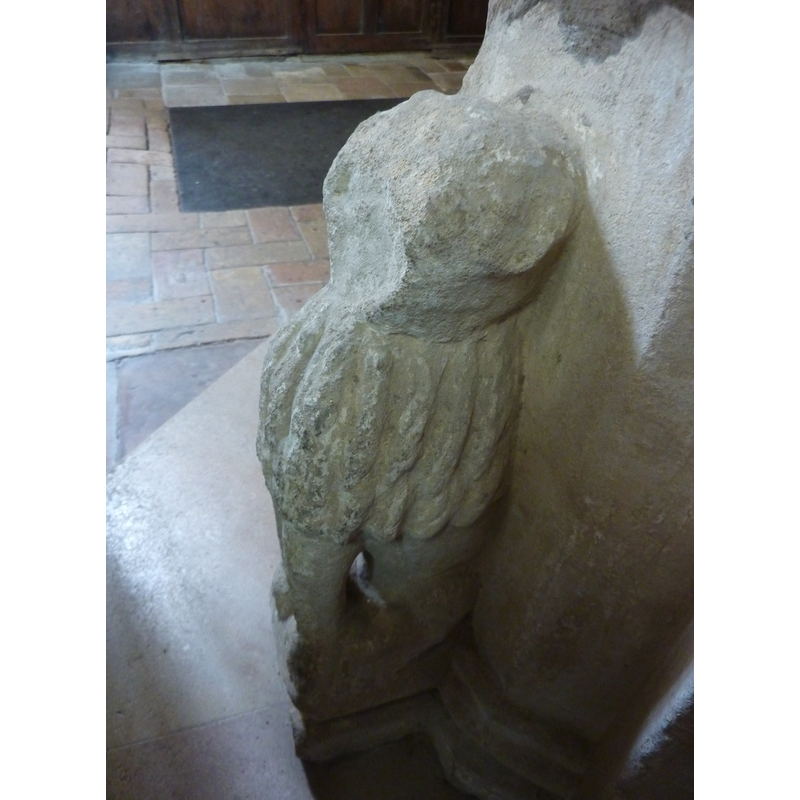
BU01: angel - demi-figure - 8
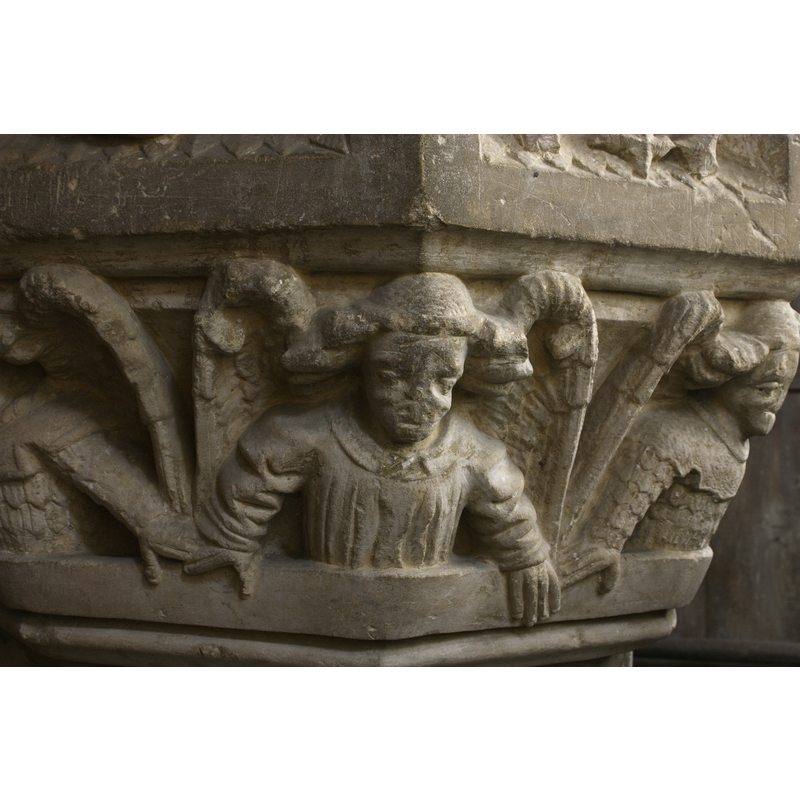
Scene Description: of the 'big-hair' type common in some East Anglisn fonts; some wear dressy tops; others appear to wear partial armour; all stand with their hands over the lower moulding, their hands touching, as spectators watching a show from a balcony
Copyright Statement: Image copyright © Peter Austin, 2010
Image Source: digital photograph taken 9 October 2010 by pete-astn [www.flickr.com/photos/53366513@N00/5066084000/]
Copyright Instructions: Standing permission
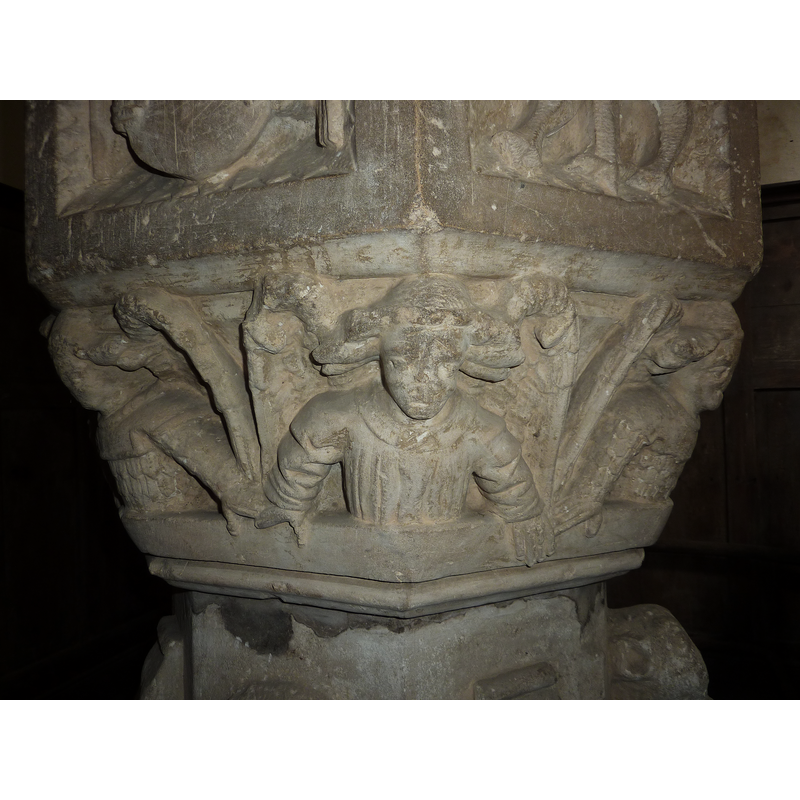
BU02: angel - demi-figure
Copyright Statement: Image copyright © Janice Tostevin, 2012
Image Source: digital photograph taken 4 July 2011 by Janice Tostevin for BSI
Copyright Instructions: Standing permission
BU03: angel - demi-figure
Copyright Statement: Image copyright © Janice Tostevin, 2012
Image Source: digital photograph taken 4 July 2011 by Janice Tostevin for BSI
Copyright Instructions: Standing permission
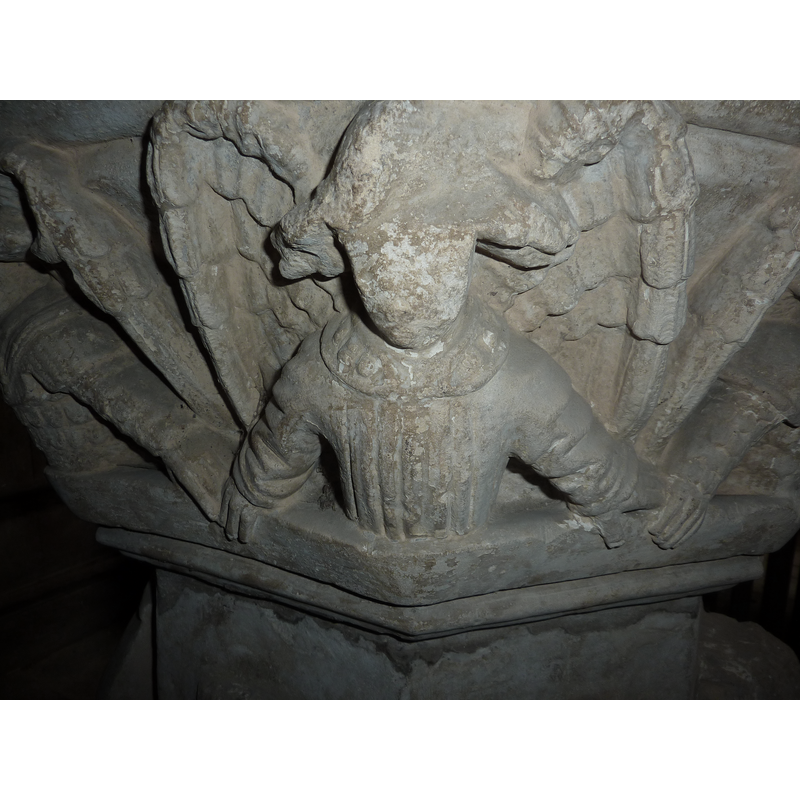
BU04: angel - demi-figure
Copyright Statement: Image copyright © Janice Tostevin, 2012
Image Source: digital photograph taken 4 July 2011 by Janice Tostevin for BSI
Copyright Instructions: Standing permission
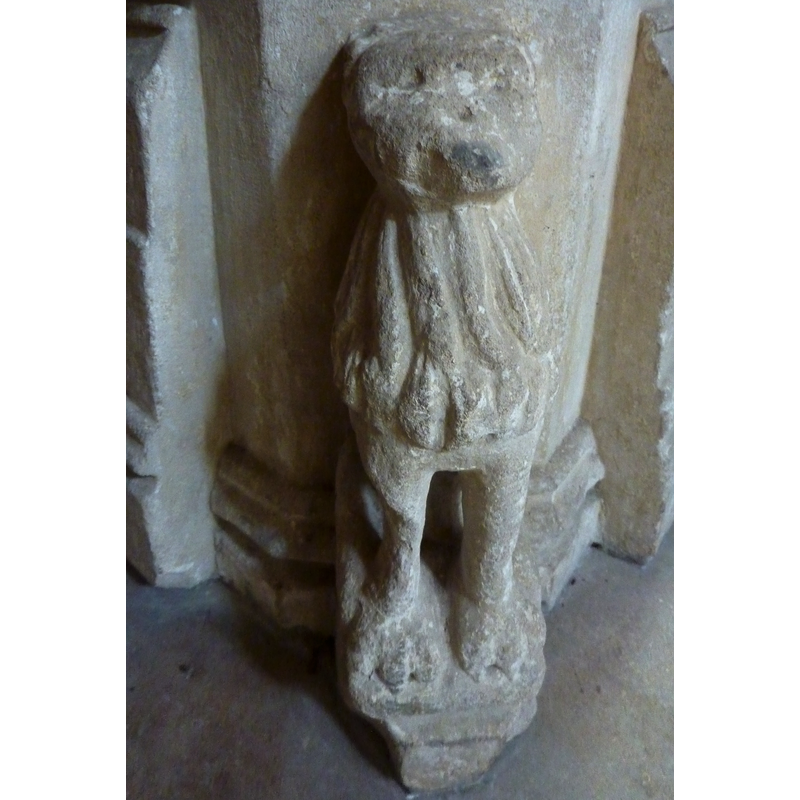
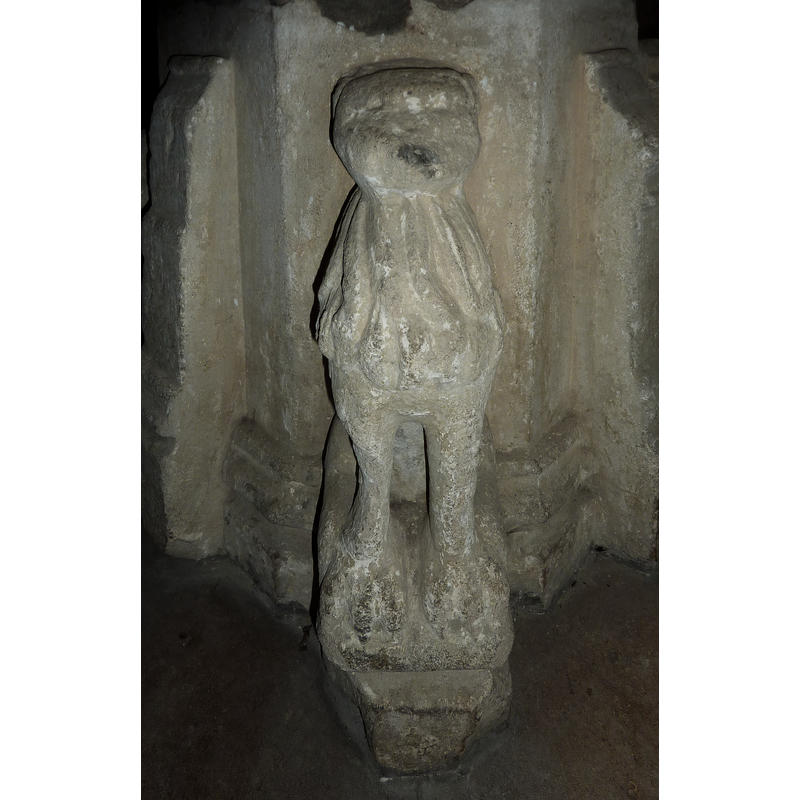
BU05: animal - mammal - lion - sejant
Copyright Statement: Image copyright © Janice Tostevin, 2012
Image Source: digital photograph taken 4 July 2011 by Janice Tostevin for BSI
Copyright Instructions: Standing permission
BU05: angel - demi-figure

Copyright Statement: Image copyright © Janice Tostevin, 2012
Image Source: digital photograph taken 4 July 2011 by Janice Tostevin for BSI
Copyright Instructions: Standing permission
BU06: angel - demi-figure
Copyright Statement: Image copyright © Janice Tostevin, 2012
Image Source: digital photograph taken 4 July 2011 by Janice Tostevin for BSI
Copyright Instructions: Standing permission
BU06: animal - mammal - lion - sejant
Copyright Statement: Image copyright © Janice Tostevin, 2012
Image Source: digital photograph taken 4 July 2011 by Janice Tostevin for BSI
Copyright Instructions: Standing permission
BU07: angel - demi-figure
Copyright Statement: Image copyright © Janice Tostevin, 2012
Image Source: digital photograph taken 4 July 2011 by Janice Tostevin for BSI
Copyright Instructions: Standing permission
BU08: angel - demi-figure
Copyright Statement: Image copyright © Janice Tostevin, 2012
Image Source: digital photograph taken 4 July 2011 by Janice Tostevin for BSI
Copyright Instructions: Standing permission
UB01: design element - architectural - buttress - 4
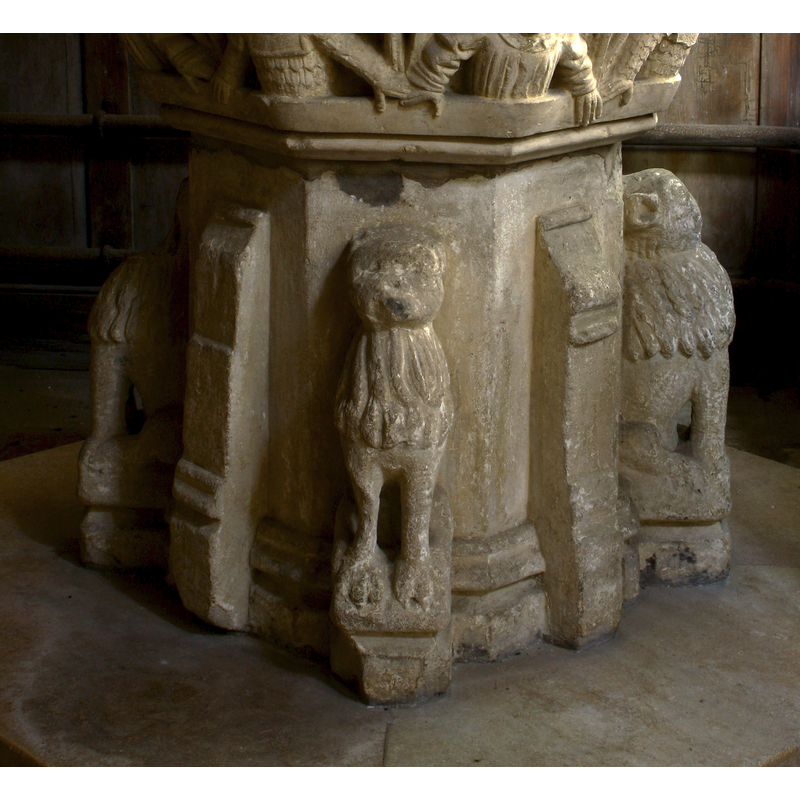
Copyright Statement: Image copyright © Peter Austin, 2010
Image Source: digital photograph taken 9 October 2010 by pete-astn [www.flickr.com/photos/53366513@N00/5066084000/]
Copyright Instructions: Standing permission
UB02: design element - motifs - moulding
Scene Description: several, around the lower side of the stem
Copyright Statement: Image copyright © Peter Austin, 2010
Image Source: digital photograph taken 9 October 2010 by pete-astn [www.flickr.com/photos/53366513@N00/5066084000/]
Copyright Instructions: Standing permission
UB03: animal - mammal - lion - sejant
Copyright Statement: Image copyright © Peter Austin, 2010
Image Source: digital photograph taken 9 October 2010 by pete-astn [www.flickr.com/photos/53366513@N00/5066084000/]
Copyright Instructions: Standing permission
UB04: animal - mammal - lion - sejant
Copyright Statement: Image copyright © Janice Tostevin, 2012
Image Source: digital photograph taken 4 July 2011 by Janice Tostevin for BSI
Copyright Instructions: Standing permission
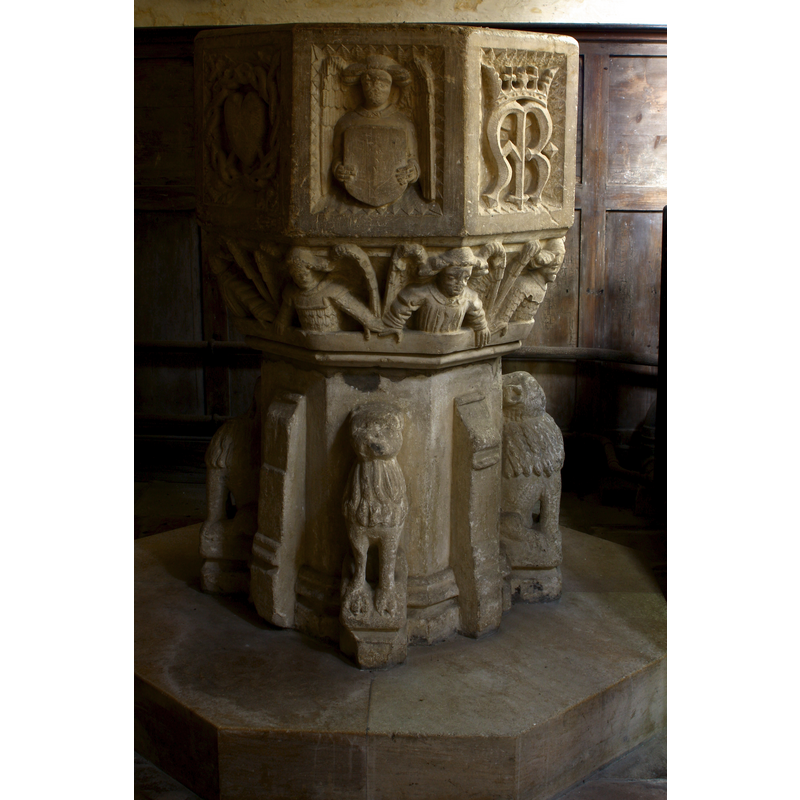
view of font - south and southeast sides
Copyright Statement: Image copyright © Janice Tostevin, 2012
Image Source: digital photograph taken 4 July 2011 by Janice Tostevin for BSI
Copyright Instructions: Standing permission
view of font
Copyright Statement: Image copyright © Peter Austin, 2010
Image Source: digital photograph taken 9 October 2010 by pete-astn [www.flickr.com/photos/53366513@N00/5066084000/]
Copyright Instructions: Standing permission
view of church exterior - southeast view
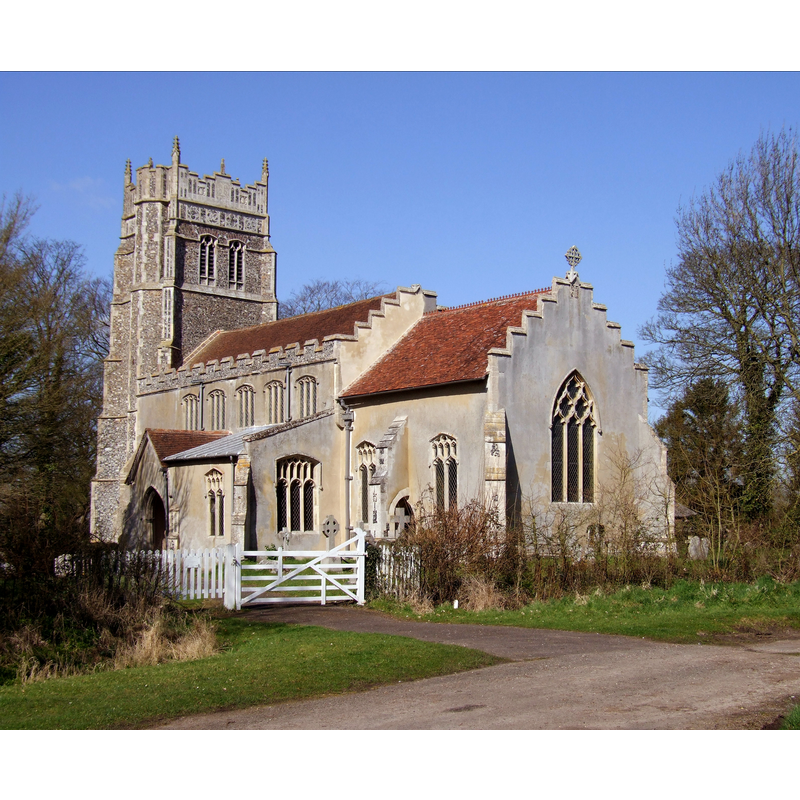
Copyright Statement: Image copyright © Simon Knott, 2008
Image Source: digital photograph taken 6 April 2008 by Simon Knott [http://www.flickr.com/photos/norfolkodyssey/2393036230/]
Copyright Instructions: Standing permission
view of church interior - nave - looking west
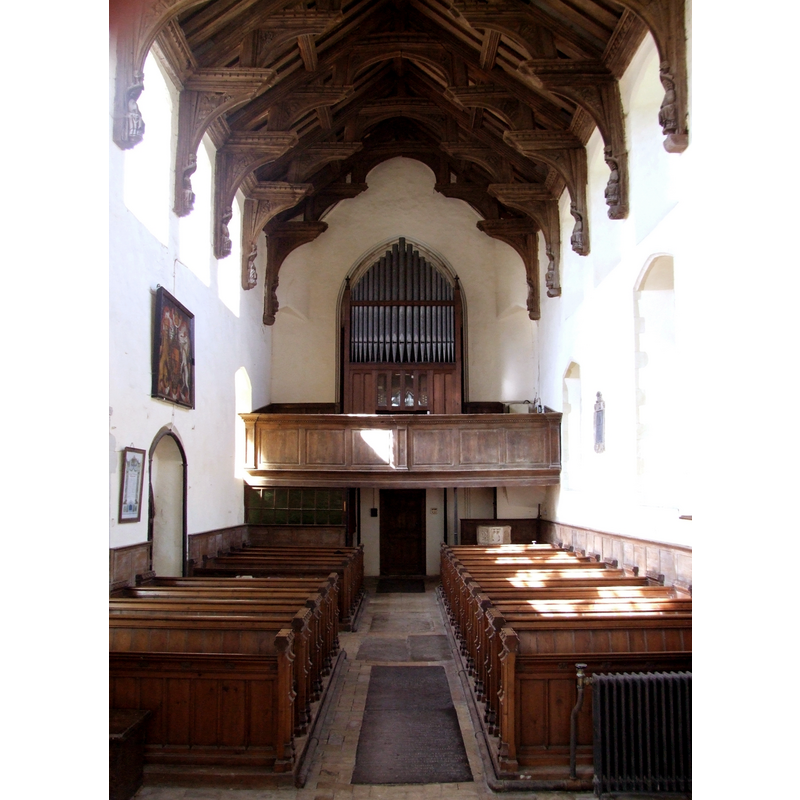
Scene Description: the font partially visible at the back (west), right (north) side, beneath the gallery
Copyright Statement: Image copyright © Simon Knott, 2008
Image Source: digital photograph taken 6 April 2008 by Simon Knott [http://www.flickr.com/photos/norfolkodyssey/2393036230/]
Copyright Instructions: Standing permission
INFORMATION
Font ID: 02592STO
Object Type: Baptismal Font1
Font Century and Period/Style: 15th - 16th century[partly re-carved?], Perpendicular [altered?]
Workshop/Group/Artisan: East Anglia font
Cognate Fonts: Many of the octagonal East-Anglian fonts
Church / Chapel Name: Parish Church of St. Mary the Virgin [redundant]
Font Location in Church: Inside the church, at the W end of the nave, by the stairs to the gallery/choir
Church Patron Saint(s): St. Mary the Virgin
Church Notes: St. Mary, Stonham Parva, is usually open; keyholder listed. The church is now redundant and in the care of the Churches Conservation Trust.
Church Address: Church Ln, Stonham Parva, Stowmarket, Suffolk, IP14 5JL, UK
Site Location: Suffolk, East Anglia, England, United Kingdom
Directions to Site: Located off the A140 (Ipswich to Norwich Rd.), 5 km E of Stowmarket, 18 km N of Ipswich; the church is just N of the Magpie Inn
Ecclesiastic Region: Diocese of [formerly in the diocese of Norwich]
Historical Region: Hundred of Bosmere
Font Notes:
Click to view
This font is not mentioned in Parker (1855). Described in Knott (2008): "The font is rather unusual; lions and buttresses support the stem, with angels under the bowl in the best East Anglian tradition - although this font is really in excellent condition. The emblems carved in the 8 panels include a crowned Marian symbol, a crucifixion with Christ flanked by Mary and St John (although Cautley has Mary and Mary Magdalene), instruments of the Passion about a heart, and a Tudor rose. There is also another crowned Marian M, but this appears to have been recut more recently. The Crucifixion is probably the finest and the most interesting of the eight panels, but is virtually impossible to photograph because of the proximity of the 18th century screen by the stairs to the gallery [...] It is probably from the same workshop as that at nearby Earl Stonham."
As indicated above one of the panels appear to have been re-carved; a second one has had most of its surface cut off, leaving only the top of the crown with two crosses; on the new space another emblem has been shallowly carved; the upper rim of the Crucifixion panel appears to have been broken and repaired. The demi-figure angels on the underbowl are of 'big hair' type (a rendering typical of some East Anglian font, in which the air appears to flow out); each of the angels wears individualised clothing, some of them armour; their faces have all been smashed. The lions of the base have been vandalised as well, but to a lesser extent. Interestingly, the damage to this font does not appear to follow the usual logic of iconoclastic vandalising; whereas the Crucifixion scene and some the symbols that would have been most offensive to iconoclasts seem to have survived, other parts of the font, like the lions of the base, that usually survive unscathed the wrath of the zealots, are here damaged.
As indicated above one of the panels appear to have been re-carved; a second one has had most of its surface cut off, leaving only the top of the crown with two crosses; on the new space another emblem has been shallowly carved; the upper rim of the Crucifixion panel appears to have been broken and repaired. The demi-figure angels on the underbowl are of 'big hair' type (a rendering typical of some East Anglian font, in which the air appears to flow out); each of the angels wears individualised clothing, some of them armour; their faces have all been smashed. The lions of the base have been vandalised as well, but to a lesser extent. Interestingly, the damage to this font does not appear to follow the usual logic of iconoclastic vandalising; whereas the Crucifixion scene and some the symbols that would have been most offensive to iconoclasts seem to have survived, other parts of the font, like the lions of the base, that usually survive unscathed the wrath of the zealots, are here damaged.
Credit and Acknowledgements: We are grateful to Janice Tostevin, to Peter Austin [aka pete-astn], and to Simon Knott [www.suffolkchurches.co.uk] for their photographs of this church and font
COORDINATES
UTM: 31U 369363 5784905
Latitude & Longitude (Decimal): 52.1991, 1.0885
Latitude & Longitude (DMS): 52° 11′ 56.76″ N, 1° 5′ 18.6″ E
MEDIUM AND MEASUREMENTS
Material: stone, limestone
Font Shape: octagonal, mounted
Basin Exterior Shape: octagonal
Drainage System: centre hole in basin
Drainage Notes: lead-lined
INSCRIPTION
Inscription Language: initials
Inscription Location: on two of the basin sides
Inscription Text: [two crowned Ms]
Inscription Source: [cf. FontNotes]
REFERENCES
- Knott, Simon, The Suffolk Churches Site, Simon Knott, 1999-. [standing permission to reproduce images received from Simon [February 2005]. URL: www.suffolkchurches.co.uk.